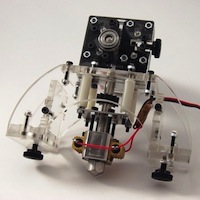
Steve of the Firearm Blog asked someone to try it, and on their home unit, that’s presumably a Makerbot Thing-O-Matic, the results weren’t quite as good. We found ABS is a pretty poor material for magazines too, but it’s certainly doable.
Category: 3D Printed Magazine Project
3D Printed AR Magazine
It’s only a five rounder, but it would seem other people are getting the idea. In our project to make a 30 round magazine for an M11 submachine gun, we found that the ABS plastic the Makerbot uses to be a bit too flexible for a 30 round magazine. At some point, Jason and I will get around to test firing the design we worked on. But this is pretty neat, considering this 5 round AR mag uses a plastic spring also made on the 3D printer. Our magazine used a metal spring that was from a broken magazine.
Welcome Instapundit Readers
If you’re following here after seeing my interview on PJTV, you can find all the posts related to our 3D printed magazine project here.
First PJTV Interview
I speak for a bit with Professor Glenn Reynolds about 3D printed magazines, among other things. For those who are interested in the project, you can explore the category here.
The one thing I hate about interviews is the sound of my own voice. I normally don’t think I have much of a Philly accent, but I can hear it stronger when I’m listening to myself.
3D Printed Magazine
Just so you know, we haven’t forgotten about it. Things have gotten busy, and since we’re at the point we need to field test it, that means we need to find time to shoot at a mellow range. This time of year that’s harder than it should be. I haven’t even been making it to the regular matches at my club.
Live Fire Tests
Jason tells me we’ve gotten to the point in the magazine project where we’re ready for a live fire test. There’s only one problem: we need a place where we can both shoot and film. There’s a range near us that allows full-auto, but it does not allow cameras or recording equipment, I’m guessing because of people’s tendency to do stupid things with guns when cameras are turned on them. At my club, we could film, but we couldn’t fill the magazine, and definitely could not shoot the machine pistol on full auto. So I need somewhere within 20 or so miles of Philadelphia that will allow full auto and for the experiment to be filmed for posterity. Anyone know of such a place?
Jason on Printer Issues
 My goal was to try to come up with a design where if you had one of these low cost ABS printers, you could just download the file, print the parts, superglue them together, add the spring, and you’d have a working 32 round magazine.
Right now I’m at the point where you can download the file, print the parts, superglue them together, sand like crazy, add the spring, and you would have a somewhat finicky 20 to 25 round magazine.
The problem I’m having is a combination of ABS being a bit too flexible and software issues with tool path generation. The walls of the magazine needs to be at least a couple millimeters thick and solid in order to prevent excessive flexing. The tool path generating software (Skeinforge) doesn’t deal well with thin solid walls whose thickness is some uneven multiple of the print head width. For example, if the wall thickness is 3.5 times that of the print width, it will generate one pass along the outer surface of the wall, one pass along the inner surface, and then one more interior pass against either the outside or inside surface. But that leaves the remaining 0.5 of the wall thickness unfilled, and you end up with a hollow very flexible wall. What it really should be doing is a zig-zag like pass over the wall interior. I can trick Skeinforge into filling in the walls completely by lying to it about print head width, but the wall surfaces end up off a bit and then I have issues with the magazine fitting in the mag well or the rounds fitting in the magazine. So I’ve been tweaking the wall thickness and print head size setting in order to try to get Skeinforge to do what I want.
The right solution is probably to modify Skeinforge so that it will generate the correct tool paths from the correct model, rather than adjusting the model to try to make up for Skeinforge’s deficiencies.
Other than the flexing issue ABS seems to be strong enough. I have one magazine I printed which can hold the full 32 rounds and feeds fine, but it bulges so much when fully loaded that it won’t fit in the mag well. The one magazine rupture I had was due entirely to a mistake in the cad file that caused the printer not to correctly bond the insert pieces (where one section of the mag body fits into another) to the rest of the part.
It Starts With a Design
 The first step in figuring out how to print a magazine on a 3D printer is deciding which magazine to make. Those of you who know the gun can probably identify the magazine showing here as being to an M11 submachine gun. We selected this magazine for a few reasons.
One, there’s a factory design that’s made from all plastic, which gives us a starting point. Two, Jason has a legally owned M11 submachine gun.Three, it would be really cool to make a magazine that can keep up with a full auto cyclic rate. Since we’re still prototyping, and have not moved into testing, this might prove yet to be rather cocky. In truth I’d be happy to have one that keeps up on semi-auto.
But there are some difficulties here. The plastic M11 magazine is made from a molded thermoset polymer. These types of polymers form rigid cross-linked polymer chains during the curing process that while less flexible and more brittle, also tend to be fairly strong. MakerBot’s Thing-o-Matic extrudes ABS, which is a thermoplastic. Thermoplastics are less brittle, but also not as strong, and certainly more prone to flex. Â On top of that, there are issues with the extruded printing technique. All of these mean it’s probably going to be impossible for our printed magazine to have a capacity that’s identical to the factory magazine because of the need to have thicker walls due to the limitations of our material and printer.
To the left you can see a CAD drawing of our current prototype. Due to the size limitations on the printer’s build area, it requires the magazine to be broken down into three different sections to be printed, and then glued together at the end. In the drawing you’ll notice there are round disks over or under some of the parts. This indicates the parts in question are to be printed standing up, and the disks are intended to stabilize the part during the printing process. After the print run is finished, the disks can be cut away with an X-ACTO knife.
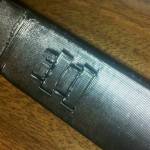
 Showing above on the right (click to embiggen) a printout of an early prototype magazine. You will notice, if you look carefully, exactly how the printer extrudes. It builds layer on top of layer of strands of melted ABS that are fractions of a millimeter thick, resulting in the texture you see in the photograph. Unfortunately, these ridges provide a rough enough surface to encourage the magazine to hang up and jam. They can, however, be sanded out, but that’s painstaking work.
In further posts I will be talking about my follower design, and maybe I’ll see if Jason wants to come on and speak of some of the difficulties with doing the magazine body, and some of the steps that had to be taken to make it all work.
What We’ve Been Up To
You might be able to guess by this conversation between my friend Jason and myself:
Jason: Doh! Had a catastrophic magazine failure.
Sebastian: What happened?
Jason: Body came apart and rounds went flying everywhere.
Sebastian: At the glue seams?
Jason: Yeah. But it wasn’t the glue. The plastic failed.
Sebastian: Ack
Sebastian: I wonder if painting some epoxy on the outside and letting it cure would strengthen the magazine body.
Jason: Maybe. I’m going to try making the walls a little thicker.
Jason: The failure was due to a mistake in the scad file. Its not a design problem.
Sebastian: Good to hear
In case you didn’t figure it out, we’re attempting to design a “high capacity” or “extended” magazine that can be printed on a 1200 dollar 3D printer. Whether we succeed or fail, I will report on the effort. Jason is doing most of the work, since he’s the one who owns the printer. My contribution to the project was designing the follower. Obviously we can’t print a spring with a printer that extrudes ABS plastic, so we won’t be making that ourselves. What are they going to do? Outlaw springs? A spring would not be remarkably hard to make, but just to save the frustration we’re going to use a spring from a broken magazine for the same gun.
Turns out this is a lot harder than would have been anticipated. I had to make changes to the follower last night, and Jason has had to make several modifications to the magazine body. There’s also been modifications necessary on the printer. My feeling is this would be fairly easy to make work on an expensive commercial device, and that the limits of home 3D printing are being pushed to the limits on this project.
It is our intention to definitively show that banning magazines is a fool’s errand in a world where people have easy access to this kind of technology. Once we have a working design, anyone with the Makerbot printer, some glue, and a spring, could download our magazine design, print it, and have it work. I will publish the design here, because I want it to spread far and wide. I’d like to see Paul Helmke try to argue we need to ban CAD drawings too, or restrict 3D printing technology. You can’t put the genie back in the bottle. We’re going to do our best to prove that.
Stay tuned to this blog for further updates on our progress. I might invite Jason back to post on some of the stuff he’s worked on, since the last time readers here heard from him was in 2007 when his Calico M950 blew up in his face (both he and the gun are fine now). I have created a new category for this topic.

