Shapiro’s Bloomberg Appeasing 80% Ruling

Attorney General is often a good stepping stone to Governor. So if you have those kinds of ambition, you’ll want an issue that isn’t liable to get a Virginia-sized revolt going, but that will please your party’s paymasters. Shapiro has found his issue. Bloomberg has a huge hard-on for stopping “ghost guns,” so if you ask me, that’s what this is about. It’s a good old fashioned moral panic among the right kind of people, and these days, thanks to social media, we do love ourselves some moral panic.

Granted, this is just about the most useless thing in the world: literally the only person this is going to deter is someone who has no ill intent. The only thing I can think of that’s more useless are “no guns allowed” signs where the sign is basically the security plan. Shapiro has decided that hunks of inert metal need to be regulated. I suppose you could throw it at someone and cause a decent head injury.

Shapiro’s opinion hinges on the definition in the UFA of “may readily be restored.” OK then. How much machining is needed to qualify? Notice he doesn’t say 80% lower. Is a block of aluminum now a firearm? I have literally no idea how to comply with this opinion. It’s essentially nonsense.

Attorney Josh Prince is of the opinion that if taken to court, it would not end well for the commonwealth, and I hope he’s right.

What Condition Do You Store Your Guns?

When the Balloon Goes Up has an interesting discussion topic. Do you store your guns all loaded, nothing loaded, or a mix? I’m in the mix category. The carry arms (only two, a Ruger LCP and a Glock 19) are loaded and stay loaded unless I’m cleaning. The Glock and LCP also never leave their holsters except for cleaning and shooting as well.

Anything that goes into storage (the safe) is unloaded. The gun gets checked going in, and checked going out.  The only exception I make to unloaded guns in the safe is if we have to leave the house for an extended amount of time (for instance, to go to New Jersey, New York, or DC) and can’t take the guns, in which case they go in the safe, in the holsters, on the free part of the shelf (which doesn’t have a rack). The lower part of the safe is always unloaded. I have to juggle a lot of guns around if I want to get to something in the back of the safe, and I’m just not going to risk bumping a bang switch while jostling stuff around, and some of the guns in there have fine triggers that wouldn’t take much. I’m a big believer that if you’re going to keep loaded guns off-person, they should remain, always, in a holster, so that the trigger is protected.

To Crimp, or not to Crimp?

I’ve gotten 50 rounds of 6.8 Remington SPC loaded, and 100 round of .223 loaded. I have a progressive press a reader sent me a while back (a Lee, which he didn’t use anymore and wanted to get rid of), but I only have the necessary equipment to load pistol ammo with it, and the Lee progressive has a rough time with that, so I’d be worried with rifle ammo.

For rifle ammo, I’m loading on a single stage press. For practice ammo, I don’t weigh each charge, and I’ve actually found the Lee powder charger throws a pretty consistent load once you run it five or six times. I’m limited in speed mostly by press time. I do 50 at a time. My process is as follows.

  1. Run 50 rounds through the tumbler to clean off the brass.
  2. Stage them on my reloading block, after running them through the separator.
  3. Spray them with some reloaders KY.
  4. Decap & resize on the press & move to finish block.
  5. Seat the primers, move back to staging block.
  6. Adjust the powder throw, charge 50 cases, move to finish block.
  7. Check all the cases for proper charge, seat the bullets.
  8. Seat all the bullets, measuring the first few for overall length, moving to staging block.
  9. Crimp bullets on the press.

The last part I’ve heard various advice on. Some people suggest you don’t need to crimp the bullets, and that the military only does it because they have to stand up to rough handling in machine guns. When I first starting reloading, I’m pretty sure I was over crimping, which can be dangerous. But I still tend to think a light crimp on the bullet is good for firing through a semi-auto, despite the extra cycle through the press it takes for each batch of 50. What do you think? To crimp or not to crimp?

More on Cheap Safes: The DAC Fast Open Sportsafe

Following up on my previous post about portable gun safes, Bitter had a DAC Fast Open Sportsafe sitting around that she had long lost the key for, and thought contained her passport. I decided to have a go at this, after watching some of the more detailed videos this guy produced explaining the common vulnerabilities. The good news is that the DAC Sportsafe, based on my non-expert attempts to crack, is good for protecting a gun from a young child. It doesn’t seem to open if you impact it any way that I could find, and rather than a latch, the electric motor extends and retracts a thick crossbar, which is held in the closed position by reasonably strong spring. The motor likely uses a worm gear to retract it against the spring. The mechanism from the inside is protected by plating, so any attack on the latching mechanism through the door or from exposed bolt holes will likely fail.

The bad news is that I did get into it, and now that I know how to do it, I could develop a tool to do it quickly. So for burglary, it’s not so great for someone who has knowledge on how to defeat it, and if it’s left unsecured to a floor or heavy furniture. The DAC’s fatal flaw is the rubber keypad, which if removed, allows both the electronics to be accessed through several holes. The DAC Sportsafe has an external power adapter that can be easily removed, also allowing access to the electronics inside. I did not explore attacks on the electronics, except to try a quick shorting attack on the external power adapter which did not work. With the cover off, a small gap can be noticed between the outside plate, and the plate they used to to “cover” the electronics. This gap allowed me to slip a blade from my Leatherman inside to push the crossbar out of the latch, pry the door back a bit, and then remove the blade, causing the door to open. The disappointment is that this could have been easily prevented by extending the steel plate a few millimeters so the plates overlapped. Bitter’s safe did not have power, so I could not try a learn button attack, to reprogram the access code, but a learn button attack on this safe is simple enough if you do not have the  base plate on, and the safe secured. You can do it with an old coat hanger. If you have a DAC Fast Open Sportsafe, the best thing you can do to helps is security is to properly secure it to a floor or furniture.

This is all making me wonder if people would pay 200-300 dollars for an electronic quick-open safe that is secure enough that you’d force an intruder or burglar to attack from the outside with cutting tools or drills. Most of these flaws are easily avoidable with a little engineering thought, and wouldn’t end up adding a whole lot to the overall production cost. Any cheap, portable safe is going to be vulnerable to cutting tools and drills, so the primary purpose of a safe like this is securing the gun against unauthorized access by children and burglars who don’t have the knowledge, tools, or time to engage in drilling or cutting. No safe is going to stop a determined professional who knows what he’s doing. I’d have to say the DAC Fast Action Sportsafe does a better job than most that we saw in the last post that had flaws, especially if properly secured to a floor or heavy piece of furniture, with the bolts installed properly and with thread lock used. I’d say if you’re going to buy a portable, Fast Open safe, this is a better option than many of the others that were exploited in Marc Tobias’s videos.

CNC machining an AR-15 lower

The following is a post by my friend Jason, who is not a regular contributor, but has posted in the past on our 3D magazine printing project. I thought this would be an interesting addition, and a demonstration of how technology is making gun control a virtual impossibility. Below is his post.

-Sebastian

I’ve been meaning to try this for a while now (using the AR-15 lower receiver solid model from http://www.cncguns.com/downloads.html), but I wanted to do it using all open source software, and was having trouble finding something that could generate tool paths from the AR-15 model. PyCAM seemed to be the best bet, but whenever I tried it on very complex model it would very quickly use up all the memory (8GB of ram plus 8GB of swap) and bring the computer to a screeching halt.

I recently had a project at work where I needed to make a much simpler part, and not wanting to go back to using BobCAD under Windows, I gave HeeksCAD and PyCAM a try. It worked out pretty well, and in the process I discovered and fixed a memory leak in PyCAM

PyCAM is still horribly inefficient in its memory usage, but with the memory leak fixed and a new computer with 16GB of ram I was finally able to generate decent toolpaths for the AR-15 lower.

The equipment/software:

So now I’m all set to give this a try, but I can’t find the block of aluminum I had intended to use. But I did have a block of Delrin left over from an earlier project, and Delrin should be strong enough to handle a .22 cal upper. So I’m trying to make a delrin lower first for use with a .22 cal upper, and if that works I’ll order some aluminum and make another lower for use with a .223 upper.

Note that I’m not an expert in material properties (nor a machinist) so don’t take the above statements to mean that its safe to fire an AR-15 made of Delrin. Do at your own risk.

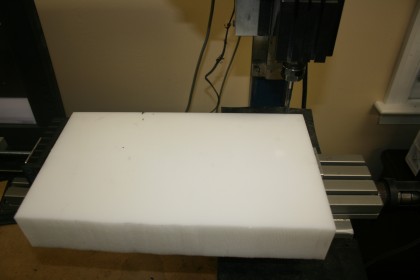
The original block of Delrin.

Original Block of Delrin to Make into AR-15 Lower


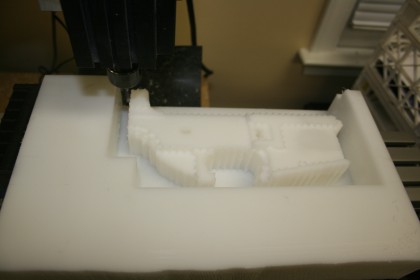
After a first pass rough cut with a 0.25″ diameter end mill.

First Cuts with CNC Mill AR-15 Delrin Lower Receiver


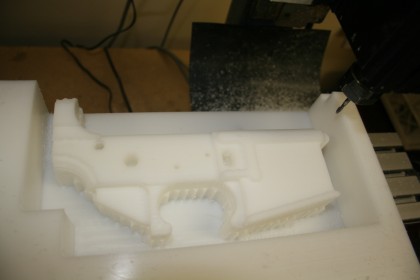
After a second pass using a 0.125″ end mill and a much smaller grid size.

Second pass with CNC mill on Delrin block to make AR-15 lower


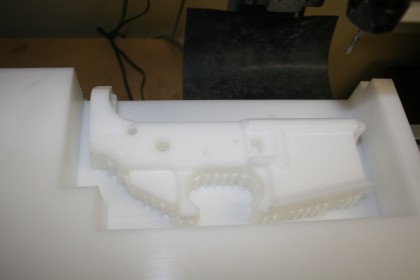
After a finishing pass with a 0.125″ ball nose mill.

Final Pass AR-15 Lower Delrin CNC


Now things are going to get a little complicated. I’m going to have to make some sort of jig to hold the part in place while I machine the other side.

Nifty AR-15 Cleaning Tool

I am intrigued by this tool originally brought to the community by The Firearm Blog:

I am an anal retentive gun cleaner, when I set out to clean. I get over this obsession by trying not to think about it. But when I tear down a gun for cleaning, I want everything immaculate. This tool would seem to be tailor made for the anal retentive.

I say that because I’ve never been convinced that buildup on that particular part mattered in terms of function and reliability of the system. Certainly the rings need to be clean, but do you care about the part that shown being clean in the video?

Gunsmith of Williamsburg, and Other Junior High Films

Many thanks to Clayton for pointing this series of videos out:

You can see some other parts on YouTube here and here. I probably watched some of the Colonial Williamsburg Foundation videos myself when I was in Junior High too. It’s occurred to me that I was probably among the last of the 16mm film reel generation. When I entered high school, the schools were just starting to get the newfangled Laser Discs, which could be controlled with a nifty Apple IIGS computer. Kids today will never know the disappointment of being subject to regular lessons because the projector wouldn’t track correctly, the film reel broke, or the bulb in the projector blew out (some teachers knew how to fix these things, others didn’t). I’m sure with a new generation of media came a new generation of films, which means kids today will miss out on the delight of what I saw in Volcano National Park in Hawaii, reliving some interests from childhood:

Parts two, three and four if you’re interested. Documentary filmmaking today doesn’t have the same dry, cheesy appeal. No dramatic score, or inappropriately deadpan, unenthusiastic narrator. In part four, at the end, I was particularly struck by the fact that they used, as evidence of mother nature recovering, that they tilled over the soil, and planted some papayas, and they grew, dammit! Today it would be some kumbaya crap about fragile native plants that man as clearly destroying growing in the lava, and starting the cycle anew, rather than man punching mother nature right back in her face and getting some farming action back on.

As it is, I hiked through the area mentioned here, and it’s still pretty desolate.

I guess we didn’t punch mother nature quite hard enough. Not often you get to hike on naturally made, volcanic gravel — a remnant of the lava fountain that spewed here for a while.

Cleaning and Lubrication Tips from NSSF

NSSF is producing some interesting videos helping people maintain their firearms. This is one of them:

[youtube]http://www.youtube.com/watch?v=1uZTM6WnICY[/youtube]

It’s a great service, I think, because a common mistake gun owners make is over-lubricating their guns. I will admit, when I was a beginner gun owner, I used WD-40 to lubricate a gun, which catches fire once it gets hot enough. One advantage to having a Kalashnikov as your first gun is it’ll take pretty much all the abuse you can throw at it with beginner mistakes.

The Gun Designed by Politicians

Tam is having issues with her Ruger Mk.III 22/45. I shoot the Hunter version of the same pistol when I do metallic silhouette, which is a few times a month. The loaded chamber indicator and magazine safety are problems in this design, if you ask me. I haven’t had Tam’s specific problem, but I’ve had other weird malfs that resolve themselves when you remove and re-seat the mag. The magazine safety is just a bad bad idea, for a lot of reasons, and the loaded chamber indicator (also a bad idea) makes the chamber very difficult to clean. The LCI will get gunked up over time, which always makes me nervous, because the smooth operation of the spring on the Mk.III LCI is critical to prevent a strike on the LCI flag from setting off the round (such as if you drop the gun).

I chose to solve the problem of fussy internals by getting a Volquartsen trigger kit. It doesn’t get rid of the two bad features, but it’s much much better than the factory Ruger trigger, and I’ve yet to have any serious problems with stoppages and the like. It helps make the Mk.III into a pretty nice shooter. They also have a kit for the Mk.II as well. I would highly recommend.

I understand that Ruger wants the Mk.III line to be legal in as many states as possible, but my suggestion for Ruger would be to either go back to the original Mk.II design, or at the least make the LCI and mag safety easy to take out. In computer user interface design, it’s a given that you never want to cripple your advanced users for the sake of novices. That philosophy can be applied to pistols too, I think. You can’t really beat the price point of the Mk.III and Mk.II for what you get, and with the addition of the Volquartsen kit, can be just fine for competition use. It’s a shame that anti-gun politicians have turned this flagship brand in American shooting down such a wrong path.